How can we help you?
Search our knowledge base or browse categories below
Browse by topic
Topic Categories
Find articles by conference, papers, TPC, reviews, and decisions.
For Authors / Submitters
To create a new submission in Sparcly, follow these steps:
- Log in to your Sparcly account.
- At the top of the page, click Conferences.
- Select the conference you wish to submit your paper or proposal to.
- On the conference page, navigate to the section labeled Available Tracks for Submission.
- Choose the track that best matches your paper's topic.
- Click Submit under the selected track.
- Step 1: Basic Information, fill in all required details,
including:
- Paper Title
- Abstract
- Paper Topic
- Paper Category
- Keywords (Minimum 3)
- Step 2: Authors
- Add all co-authors with their full details (Full Name, Affiliation, Country, email, CA).
- You may reorder the authors according to their original order in the paper.
- You may Edit/Remove any authors from the Action tab.
- Step 3: Review and Create:
- Review all information to ensure accuracy.
- You can edit any information in any step
- If all information is correct, acknowledge the conformance rules
- Click Submit Paper to finalize your submission.
- Upload your PDF Review manuscript under Attached Files
After submitting, you can:
- View your paper in the My Papers section on the left
- Edit details or replace the PDF (if before the review deadline)
- Track review progress and final decisions
To add, remove, or edit co-authors:
- Go to My Papers from the left menu.
- Find your submission and click the Edit action beside it.
- Open the Authors tab (second tab).
- From here, you can:
- Add new co-authors by entering their name, affiliation, country, and email.
- Remove existing co-authors using the delete action beside their name.
- Edit co-author details as needed.
To replace your manuscript file in Sparcly, follow these steps:
- Go to My Papers from the left menu.
- Find your submission and click the Edit action beside it.
- Scroll to the Manuscript File section on the right side of the page.
- Locate your current uploaded PDF.
- Click the Replace icon to upload a new version of your file.
- Select your updated PDF from your device.
- Confirm the upload and wait for the system to process the new file.
Your manuscript will now be updated with the newly uploaded PDF.
Sparcly paper ID is a unique 10-digits ID that can be found in the first column of My Papers.
Each submission in Sparcly goes through specific stages depending on its completeness and review progress. The statuses include:
Pending
- The submission has been created but no PDF has been uploaded yet.
- It is not considered a complete submission.
Active
- The submission is complete with a PDF uploaded.
- It is officially part of the conference submission list and may be assigned for review.
Under Review
- The paper has been assigned to reviewers.
- Reviewers are currently evaluating the submission.
Review Completed
- All assigned reviewers have submitted their reviews.
- The paper is ready for the decision phase.
Accepted
- The conference committee has reviewed the evaluations and accepted the paper.
Rejected
- The paper has been declined based on review results or conference policies.
Withdrawn
- The paper has been withdrawn by the author(s).
For Conference Chairs
To create a new conference in Sparcly, follow these steps:
1. From the Conferences page at the top
- Select Create Conference (top right button).
2. Step 1 – Basic Information
Clone from Code (Optional):
If you have a clone code from a previous year's conference, validate this code
to copy the conference Metadata, Tracks, settings, Topics, TPC Members, etc., to
the new conference.
Otherwise, enter the essential details for your conference:
- Conference Name
- Short Name (e.g., Research2026)
- Description (shown to authors on Sparcly submission page)
- Sponsor (e.g., IEEE, ACM, etc.)
- Conference Webpage URL
3. Step 2 – Specializations
Select 1 to 3 Specialization Areas that represent the main topics of the conference.
- Choose from predefined categories such as AI, Cybersecurity, Networks, etc.
- Expand sub-areas if needed.
If you wish to add a specific area that is not in the provided list, scroll down to Other Specialization, where you can enter it manually.
Click Next after selecting your areas.
4. Step 3 – Dates & Location
Provide the conference schedule and venue details:
- Country
- City
- Timezone
- Conference Start Date
- Conference End Date
Click Next.
5. Step 4 – LOA Configuration (Optional)
This step allows you to configure the Letter of Acquisition details:
- IEEE Conference Number
- ISBN
- Copyright Notice
- Signatory Name, Email, Phone
- Part Number
Note: This entire section is optional. If your conference does not require LOA setup yet, simply click Next.
6. Step 5 – Configuration
Set advanced settings and upload branding elements:
- Conference Billing Information
- Instructions to Authors
- Conference Logo (PNG, JPEG, GIF, WebP; max 2MB)
- Clone Options (if cloning from a parent conference)
Click Review when done.
7. Final Step – Review & Create
- Review all the entered information.
- If everything is correct, click Create Conference to finalize.
Your new conference has been created. You need to complete the basic configuration (Paper Categories, Paper Topics, Tracks) for your conference to start accepting submissions.
Once your conference is created, Sparcly provides a full management dashboard that allows you to configure tracks, submissions, TPC members, deadlines, decisions, and communication tools. Follow these steps to manage an existing conference:
1. Access your conference dashboard
- From the left menu, click Chairing.
- Select the conference you want to manage.
- You will enter the conference dashboard, Overview tab.
Conference Management Tabs
Each tab gives you control over different aspects of your event.
2. Overview
This page displays key conference information, including:
- Participant count
- Total papers
- Number of tracks
- Submitted papers
- Conference dates
- Location, sponsor, timezone
- LoA information
- Specializations
You can click Edit to update the conference information entered during creation.
3. Attributes
Under the Attributes menu, you can create and manage:
- Paper Categories – Add your conference submission(s) categories (+Add New Category), such as Full Paper, Short Paper, Poster, Demo, etc.
- Paper Topics – Add your conference list of topics (+Add New Topics). You can copy and paste an entire list.
- Paper Status Labels – The existing labels are automatically created for every conference. If you need a specific Paper Status label, (+Add New Status)
These attributes are used across tracks and submissions.
4. Submissions
View and manage all submitted papers. Features include:
- Filter by track
- View paper details, authors, and status
- Monitor submissions that are Active, Pending, Withdrawn, Under Review, etc.
- Access submission actions (view PDF, details, etc.)
5. Tracks
From the Tracks tab, you can manage your conference structure. You can:
- Create new tracks
- Create sub-tracks under any main track
- Edit or delete existing tracks
- View number of papers and participants per track
This section lets you build a hierarchical program (e.g., symposiums → sessions → sub-sessions).
6. Timeline
Manage all conference and submission deadlines. This includes:
- Conference start/end dates
- Submission start/end dates per track
Track deadlines appear in a timeline layout for clarity.
7. Review Settings
Configure how reviews are handled. You can set:
- Minimum number of reviews per paper
- Maximum reviews per paper
- Maximum papers per reviewer
- Review type (Blind or Double Blind)
- Review start and end dates
- Enable Reviewer Bidding – Allows reviewers to select papers they want or prefer not to review
- AI-Based Clustering (if enabled) – Helps optimize paper–reviewer matching
8. Decisions
Use the Enhanced Paper Decisions page to analyze reviews and finalize decisions. Features include:
- Filter by track
- Filter by minimum/maximum score, span, quality
- Detect papers with missing reviews
- Apply temporary decisions (Accept/Reject)
- Use Bulk Decision to process multiple papers at once
- Convert temporary decisions into final decisions with one click
This area helps Chairs make informed, data-driven acceptance decisions.
9. Email
Manage all conference communications. Email tools include:
- Email Templates — customize acceptance, rejection, reminders, announcements
- Email Reminders — send follow-up emails to reviewers or authors
- CFP (Call for Papers) — create and distribute your conference's CFP
Emails can be sent by track or to specific groups.
10. Roles & Permissions
Assign roles within the conference, such as:
- Track chairs
- TPC members
- Reviewers
- Session organizers (if enabled)
This affects access only within the selected conference.
More Options
Clone Code – Chairs can click Clone Code to generate or view the code used to copy the conference configuration into a new event.
Tracks define the main structure of your conference (e.g., Main Track, Workshops, Poster Abstracts). You can also create subtracks to organize parallel sessions, symposia, or category-specific submissions.
1. Access the Tracks page
- Go to the left menu and click Chairing.
- Select your conference.
- From the top navigation, choose Tracks.
You will see all tracks and subtracks displayed visually.
2. Add a New Track or Subtrack
Click + Add New Track to open the track creation wizard.
The track creation process has 4 steps:
Step 1 – Basic Information
Enter the core details of the track:
- Track Name
- Submission Type (e.g., Symposium, Workshop, Full Paper, Poster, etc.)
- Parent Track (optional) – Select this if you want to create a subtrack under an existing track.
- Inherit Settings
- Yes – Use review settings, deadlines, and associations from the conference
- No – Customize this track independently
- Description (optional)
Click Next.
Step 2 – Dates & Settings
These dates are inherited from the main conference, but you may customize them if needed. Available settings include:
- Paper Submission Start / Due Dates
- Start Similarity Check Date
- Registration Deadline
- Final Paper Deadline
Your custom dates must fall within the main conference date window.
Click Next.
Step 3 – Conference Associations
Choose which conference-level items apply to this track:
- Paper Categories (e.g., Full Paper, Posters)
- Paper Statuses (Accept, Reject, Pending, Under Review, etc.)
- Paper Topics (you may select one or multiple; "Select All" is available)
- Add new topics using + Add New Topics
Click Next.
Step 4 – Review & Create
Review the summary of all settings:
- Track Name
- Submission Type
- Parent Track or top-level track
- Customized or inherited settings
- Selected Topics / Categories
Click Create Track to finalize.
Your track will now appear in the Tracks view.
3. Edit an Existing Track or Subtrack
- Go to the Tracks page.
- Locate the track card.
- Click the three-dot menu (...) on the card.
- Choose Edit Track.
You may edit:
- Track name
- Description
- Parent Track (convert to or from subtrack)
- Dates and Settings
- Topics & categories
- Inheritance options
Click Save when finished.
4. Remove a Track or Subtrack
- Go to the Tracks page.
- Open the three-dot menu (...) on the track card.
- Select Delete Track.
- Confirm the deletion.
Warning: Tracks with submitted papers cannot be deleted unless all papers are reassigned or removed.
You can create, edit, deactivate, or delete paper categories from the Attributes → Paper Categories page of your conference.
Add a New Category
- Go to Attributes from the top menu.
- Select Paper Categories.
- Click Add New Category.
- Enter:
- Category Name
- Maximum Number of Pages (optional)
- Status (Active / Inactive)
- Click Save.
Edit an Existing Category
- On the Paper Categories page, click the three-dot menu beside a category.
- Select Edit.
- Update the name, page limits, or status.
- Save your changes.
Deactivate a Category
If a category is no longer accepting submissions:
- Open the three-dot menu beside the category.
- Choose Deactivate.
- The category stays in the system but cannot be selected for new submissions.
Delete a Category
Note: A category cannot be deleted if submissions already exist under it.
If no submissions exist:
- Open the three-dot menu.
- Select Delete.
- Confirm the deletion.
As a Conference Chair or Track Chair, you can add Technical Program Committee (TPC) members to your track using the Bulk Invite Members tool. This tool allows you to invite one or many members at the same time.
1. Go to the Track where you want to add TPC Members
- From the left menu, click Chairing.
- Select your Conference.
- Open the Track you want to manage.
2. Open the TPC Members page
- At the top menu, click Review.
- Select TPC Members.
Here you will see:
- Total Members
- Active Members
- Pending Invitations
- Chairs
- TPC Members
- Reviewers
3. Click "Invite Members"
You will be taken to the Bulk Invite Members page.
4. Use Bulk Invite Members
Bulk Invite supports adding:
- A single email
- Multiple emails
- Entire committee lists
Steps:
- Click Start Bulk Invite.
- Under Role for All Members, choose:
- TPC Member, or
- Chair (if assigning Track Chairs)
- In the Email Addresses field:
- Add one email per line
- Example: john@example.com, sara@example.com, mohamed@example.com
- (Optional) Enable Auto Accept – When enabled, members are automatically added without needing to click an email link.
- Click Send Invitations.
5. After sending invitations
Each email will appear in the TPC Members list with one of these statuses:
- Pending → Invitation sent, waiting for acceptance
- Active → Member successfully joined the TPC
- Rejected/Invalid → Email bounced or invitation expired
You can also:
- Resend Invitation
- Remove Members
- Change Roles (e.g., from TPC Member to Chair)
Important Notes
- All members added through Bulk Invite belong to the specific track you are managing.
- There is no single-invite dialog—Bulk Invite is used even for one member.
- A Track can have: Chairs, TPC Members, Reviewers (if assigned later through Review Settings)
You can manage TPC members at the track level, where each track has its own committee. Editing and removing members is done through the TPC Members page.
1. Go to the Track
- From the left menu, click Chairing.
- Select your Conference.
- Open the Track you want to update.
2. Open the TPC Members Page
- At the top menu, click Review.
- Select TPC Members.
You will see the list of all members added to that track, including:
- Member Name
- Role (TPC Member / Chair)
- Status (Active / Pending)
3. Edit a TPC Member
Currently, the editable attributes are:
- Role (e.g., change from TPC Member → Chair)
To edit:
- Find the member in the list.
- Click the three dots (...) under Actions.
- Choose Edit.
- Update the role and click Save.
4. Remove a TPC Member
If you want to remove someone from the TPC:
- Go to TPC Members.
- Click the three dots (...) next to the member you want to remove.
- Select Remove.
- Confirm the action.
The member will immediately lose access to:
- The track's submissions
- Reviewing capabilities
- TPC-related actions
Important Notes
- Removing a member does not affect reviews they previously completed.
- If a member was invited but never accepted, removal simply cancels their pending invitation.
- To replace someone, just send a new invitation using Bulk Invite Members.
Conference Chairs can manage all submissions for their event from a single unified interface. The Paper Submissions page allows you to view, filter, and take actions on papers across all tracks.
1. Access the Submissions Page
- From the left menu, click Conferences
- Select your conference
- At the top menu, click Submissions
You will now see a complete list of all papers submitted across all tracks.
2. Filter Submissions
Use the dropdown Filter by Tracks to view submissions from:
- A specific track
- All tracks (default)
You can also adjust how many entries appear per page.
3. What You Can See
Each submission displays key information:
- Paper ID & Title
- Track
- Status (Pending, Active, Withdrawn, Under Review, Reviews Completed, Accepted, Rejected)
- Similarity (if similarity check is enabled)
- Authors
- Actions
4. Manage a Submission
Click the three dots (...) next to any paper to open the actions menu.
Available actions:
- View → Opens the full paper details page (authors, manuscript, status, track, uploads, etc.)
- Delete → Permanently remove the submission
Note: Papers with reviews or activity should be removed with caution.
5. Inside the Submission View
When you click View, you can:
Review submission details
- Paper information
- Track
- Authors
- Manuscript & supplementary files
Update or manage
- Replace or delete the manuscript file
- Edit authors
- Change track (depending on conference permissions)
- Update status if needed (administrative)
1. Navigating to the TPC Members Page
- Open Chairing from the left sidebar
- Select your Conference
- Choose the Track you want to manage from the tab Tracks
- From the top menu, click Review
- In the Review menu, select TPC Members
You are now on the TPC Members management page for that track.
2. Understanding the TPC Members Page (Statistics Overview)
The TPC Members page gives you a quick overview of reviewer activity and roles for the selected track.
Statistics Overview (Top Section)
Each box summarizes the current status of your review committee:
- Total Reviewers: Total number of members who invited to review submissions in this track.
- Invited: Invitations that have been sent but not yet accepted.
- Accepted: TPC members and TPC Reviewers who have accepted the invitation.
- TPC Members: TPC members who have accepted the invitation.
👉 TPC Members can delegate reviews to other reviewers. - TPC Reviewers: TPC reviewers who have accepted the
invitation.
👉 TPC reviewers can review papers assigned to them, and cannot delegate. - Delegated: Reviews that were assigned by TPC Members to others.
3. Inviting TPC Members or TPC Reviewers
To invite new members, click Invite Members (below the statistics section). This opens the Invite TPC Members dialog.
3.1 Invitation via Email
The By Email tab lets you invite one or many members at once.
- Select Role for All Members:
- TPC Member: Can review papers assigned to them, AND can delegate invitations to other reviewers
- TPC Reviewer: Can review papers assigned to them, but cannot delegate reviews
- Enter Members Email Addresses: One email per line (supports bulk invitations)
- (Optional) Enable Auto Accept:
- Invitations are automatically accepted
- Useful when you already have confirmation from the invitees
- Click Send:
- Invitations are sent via email
- Invited members appear in the statistics and Members list below
3.2 Inviting from Track Authors
You can also invite members who already submitted papers to this track.
How it works:
- Switch to the Track Authors tab
- Search authors by name or email
- Select individual authors or enable Invite All Authors in Track
- Choose whether to Auto Accept
- Click Invite
4. Managing Invited TPC Members after invitation
Once invitations are sent, all invited members appear in the Members list for the track. This list gives the Chair full visibility and control over invitation status and roles. (Don’t forget to refresh the page to get the updated list)
4.1 Understanding Member Statuses
Each invited member has a status that reflects their current state:
- Pending: Invitation has been sent out. The member has not responded yet. The Chair can Accept or Decline the invitation on their behalf.
- Accepted: The member has accepted the invitation. They are now active as a TPC Member or TPC Reviewer. They can participate in the review process.
- Declined: The invitation was declined by the member or declined by the Chair on their behalf. The member will not participate in the review process unless re-invited.
The Date column shows when the invitation was sent and, if applicable, when it was accepted.
4.2 Available Actions for Each Member
Using the Actions (⋮) menu next to an accepted member, the Chair can:
- Manage Paper Assignments: Assign or unassign papers for this member. Useful for balancing review workload.
- Update Role: Change between TPC Member (can delegate reviews) and TPC Reviewer (review-only role).
- Remove Member: Completely remove the member from the track’s TPC. The member will no longer have access to reviews for this track.
6. Tips for Efficient Management
- Use track filters to focus on specific committees.
- Sort submissions by status to quickly identify pending or withdrawn items.
- Keep an eye on Active submissions to ensure all required files are present.
Review forms define how reviewers evaluate submissions in your conference. As a Conference Chair, you can create, modify, duplicate, or delete questions to tailor the review process to your event's needs.
Important Note: The review form is inherited by all tracks and sub-tracks. Each track or sub-track can use the inherited form as is or customize it further if needed.
1. Access the Review Form
- Go to Conferences (top bar).
- Select your conference.
- Navigate to Review → Review Form.
You will see a list of all questions currently used in the review form.
2. Add a New Question
- Click + Add Question.
- Choose the type:
- Multiple Choice
- Text Question
- Enter the details:
- Question Label (title)
- Question Prompt (description shown to reviewers)
- Required or Optional
- Weight — determines how much this question influences the final score.
- For Multiple Choice:
- Add choices (e.g., Strong Reject → Strong Accept).
- Use the Quick Templates to add standard scoring options instantly.
Click Save to add the new question.
3. Edit an Existing Question
- Click the edit icon next to a question.
- Modify:
- Question label or prompt
- Whether the question is required
- Weight
- Choices (add/edit/remove)
- Whether responses are viewable by authors
- Click Update Question.
The system automatically recalculates the total weights.
4. Reorder Questions
Drag the grid icon on the left side of each question to reorder them. The order shown here is the order reviewers will see.
5. Duplicate or Delete Questions
Click the three-dot menu next to any question:
- Duplicate → Creates an identical copy you can edit.
- Delete → Permanently removes the question.
Note: If a question already has reviewer responses, the system may prevent deletion.
6. Manage Question Weights
The review form uses weighted scoring:
- Each question has a weight (e.g., 0.1)
- The total weight must equal 1.0
The Weight Summary at the top indicates whether your form meets the required total.
7. Track & Sub-Track Inheritance
By default:
- All questions in the main conference review form are inherited by every track and sub-track.
- When creating a new track, you can either:
- Inherit settings automatically, or
- Customize the review form specifically for that track.
This ensures consistency while allowing flexibility when different tracks require different evaluation criteria.
Sparcly provides several tools to help Program Chairs assign reviewers efficiently, while automatically enforcing conflicts of interest, reviewer workload limits, and track-level restrictions.
Conflict of Interest Rules Automatically Enforced
When assigning reviewers, Sparcly automatically blocks a reviewer from being assigned if any of the following conflicts exist:
- Same Institution – The reviewer shares the same affiliation/institution as any of the authors.
- Same Email Domain – (e.g., author uses @university.edu and reviewer also uses @university.edu).
- Same Track Chair or Session Role – A reviewer who is also a chair of the track cannot review papers in that track.
- Author–Reviewer Relationship Detected – If historical co-authorship is detected
- Self-Review Restriction – Reviewers cannot review their own submissions.
- Manual Conflict Marking – Chairs can manually mark additional conflicts between any reviewer and paper.
These restrictions apply across all assignment modes (interactive, suggested, auto, and AI).
Steps to Assign Reviewers
- Go to Conference → Tracks → Review → Assignments.
- Choose your preferred assignment method from the dropdown:
- Interactive Assignment (Drag & Drop)
- Suggested Assignment
- Enhanced Auto-Assignment
- AI Suggestion Assignment
- Review available reviewers and papers.
- Assign reviewers manually or approve system suggestions.
- Confirm assignments to activate the review tasks.
Sparcly ensures:
- Minimum and maximum reviews per paper
- Balanced reviewer workload
- Conflicts of interest fully blocked
- Track restrictions respected
Sparcly offers four assignment modes to match your workflow size and complexity:
1. Interactive Assignment
A manual drag-and-drop interface where Chairs directly assign reviewers to papers.
Best for: Small conferences, Full manual control
2. Suggested Assignment (includes Bidding)
Sparcly generates reviewer suggestions using:
- Reviewer bidding preferences
- Expertise matching
- Conflict-of-interest filtering
- Balanced workload
Chairs then approve or modify the suggestions.
Best for: Conferences that use bidding, Medium workloads
3. Enhanced Auto-Assignment
A one-click automatic assignment that produces a full reviewer–paper mapping.
Uses:
- Bidding
- Expertise
- Conflicts
- Balancing
- Track constraints
Best for: Large conferences, Chairs who want automatic coverage with preview
4. AI Suggestion Assignment
AI models score reviewer suitability and recommend top matches for each paper.
Best for: Conferences with large reviewer pools, Precision matching based on expertise
This guide explains how a Main Track Chair can apply recommendations (Accept/Reject) for a single paper or using the Bulk Decision feature. The final decision will be applied by the General Chair.
Step 1: Access Your Conference
- 1- Log in to Sparcly.ai.
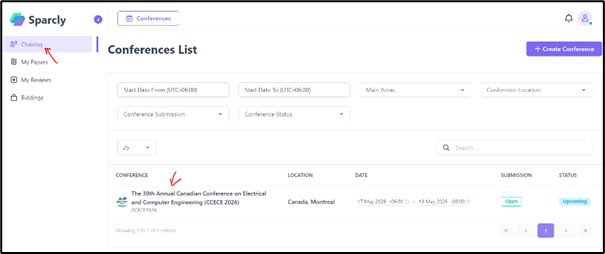
- 2- Click on the Chairing tab in the left menu.
- 3- Select your conference from the list.
You are now inside your conference dashboard.
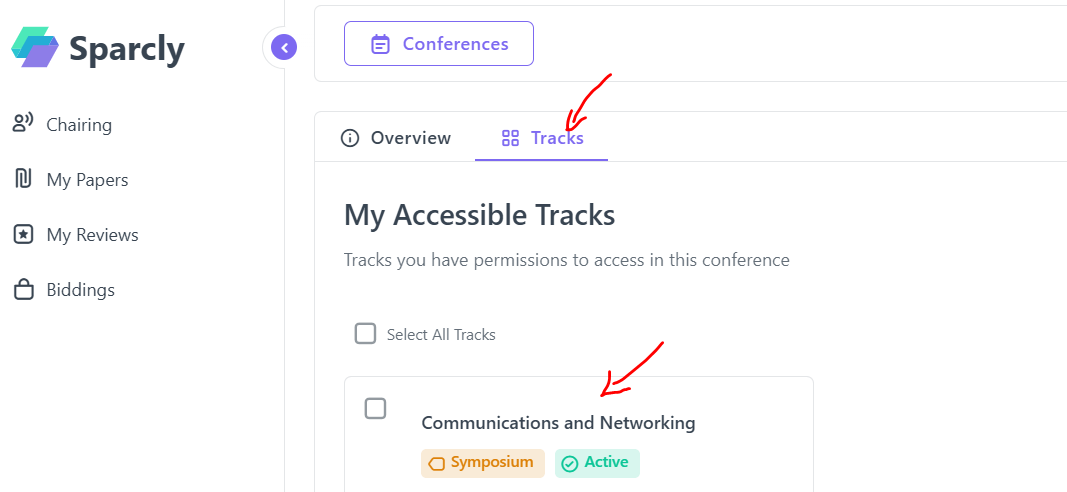
Step 2: Open Your Track
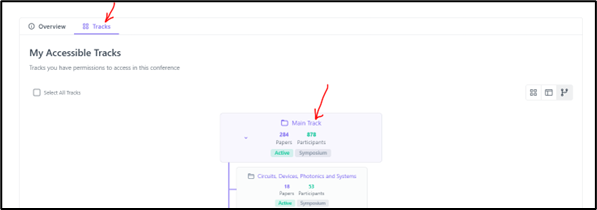
- 1- Click on the Tracks tab.
- 2- Select the track you are responsible for.
This opens the track management page.
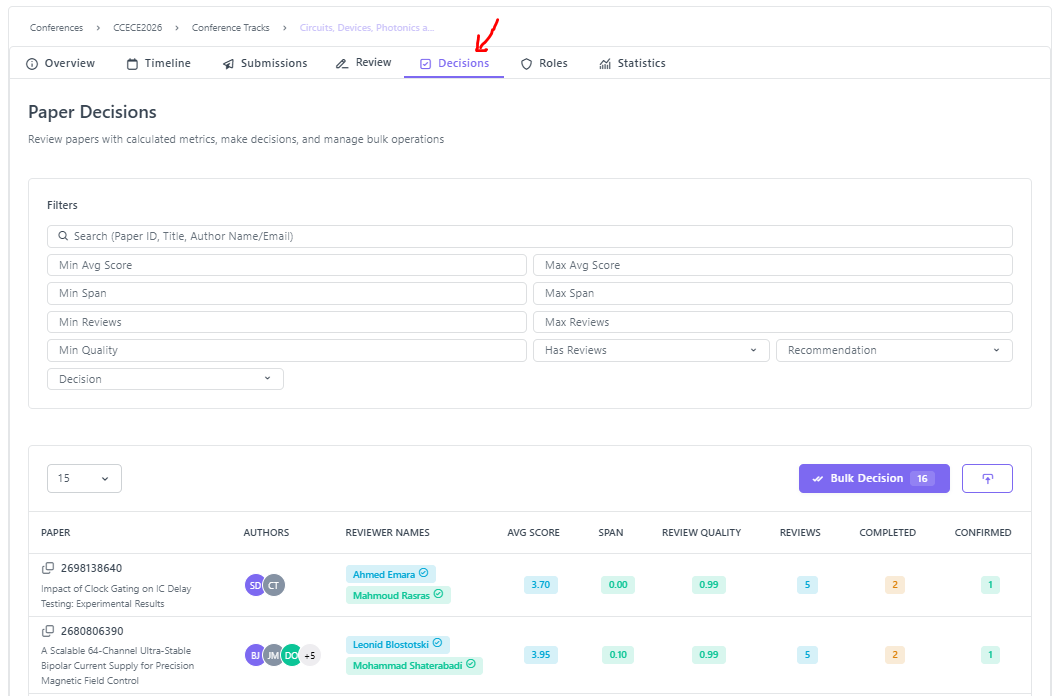
Step 3: Go to the Decisions Tab
Inside your track:
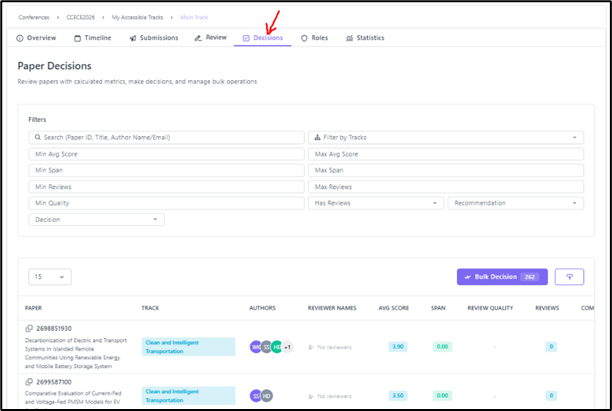
- 1- Click on the Decisions tab.
You will now see the Enhanced Paper Decisions page with:
- * A Filters section
- * A Papers table
- * The Bulk Decision button
- * The Export button
1️⃣ Filters Section
At the top of the page, you can filter papers using criteria such as:
- * Paper ID / Track
- * Minimum / Maximum Average Score
- * Minimum / Maximum Score Span
- * Minimum / Maximum Reviews
- * Review Quality
- * Has Reviews
- * Recommendation
- * Decision
These filters help you narrow down which papers are displayed. For example:
- * You can filter papers with Min Avg Score = 2.5
- * Or show only papers with a certain number of reviews
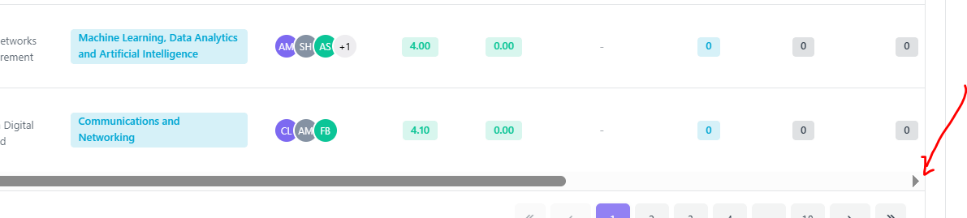
2️⃣ The Papers Table
Below the filters, you will see a table containing:
- * Paper ID and Title
- * Paper Track
- * Authors
- * Reviewer Names (who completed their reviews only)
- * Average Score
- * Score Span
- * Review Quality
- * Number of Reviews
- * Completed / Confirmed / Pending / Declined Reviews
- * Recommendation
- * Decision
- * Actions
👉 Important: Some columns are not immediately visible. You can scroll the table to the right to see more columns:
Option 1 – Keyboard
- * Click inside the table.
- * Use the Right (→) and Left (←) arrow keys to move across columns.
Option 2 – Scroll Bar
- * Go to the bottom of the table.
- * Drag the horizontal scroll bar to the right.

Setting Recommendation for a Single Paper
Step 4: Set the Recommendation
- * Go to the Decisions tab inside your track.
- * In the papers table, scroll to the right to see all columns.
- * The last column is called Actions.
👉 If you don't see it, scroll the table horizontally to the right.
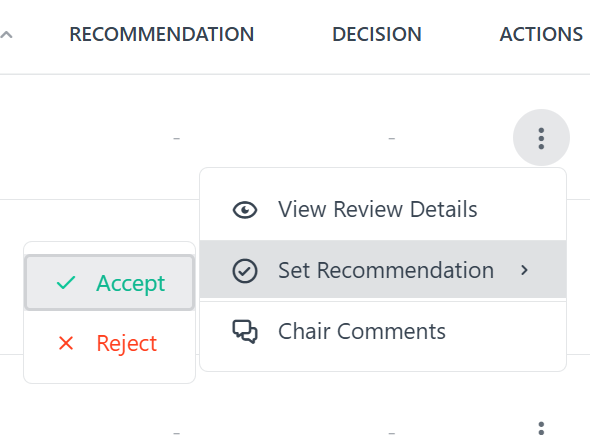
- * In the row of the paper you want to update, click the three dots (⋮) in the Actions column.
- * A small menu will appear:
- - View Review Details
- - Set Recommendation
- - Chair Comments
- * Click Set Recommendation.
- * Choose one of the available options:
- - ✅ Accept
- - ❌ Reject
The recommendation will be applied immediately to that specific paper.
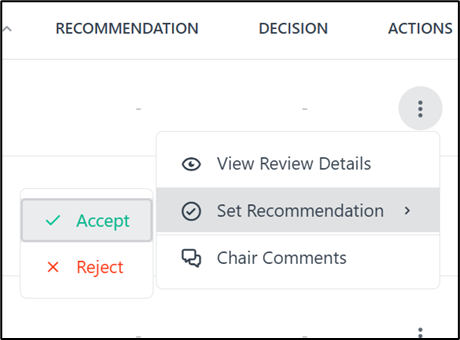
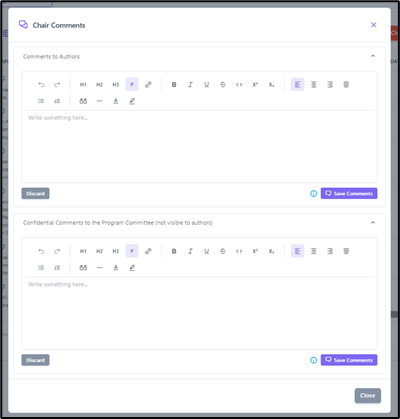
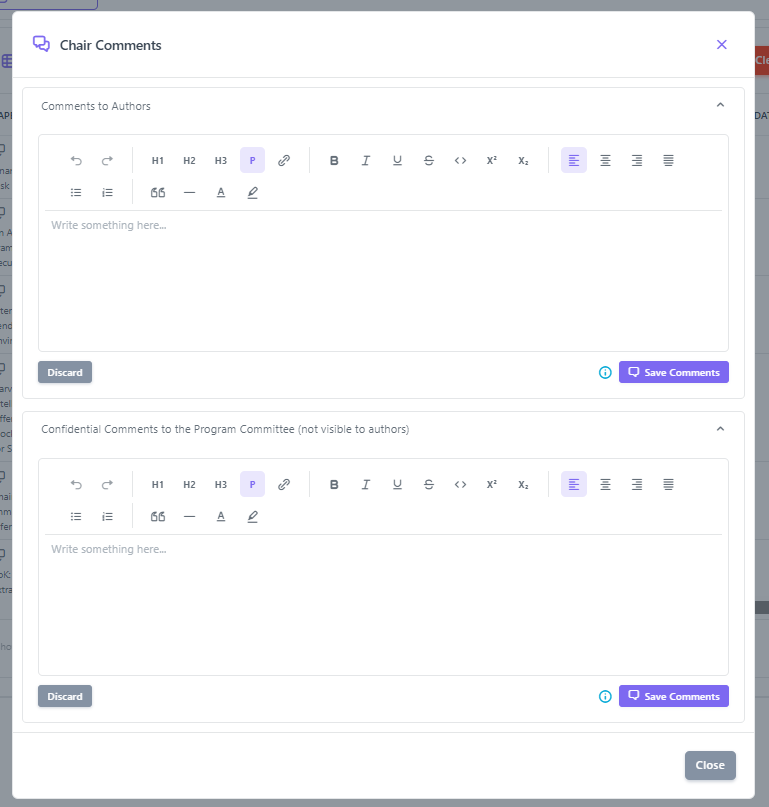
To add comments, select Chair Comments.
A window will open where you can add two types of comments:
- * Comments to Authors
- - Visible to the authors.
- - Used to provide feedback, explanations, or notes related to the decision.
- * Confidential Comments to Program Committee
- - Not visible to authors.
- - Used for internal discussion between chairs and committee members.
Click Save Comments to store your input.
Applying Decisions Using Bulk Decision
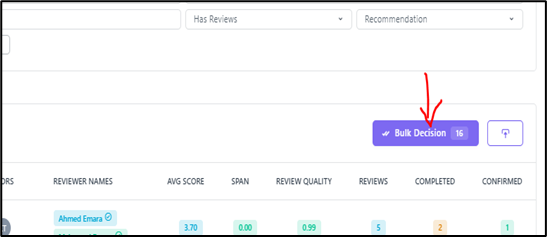
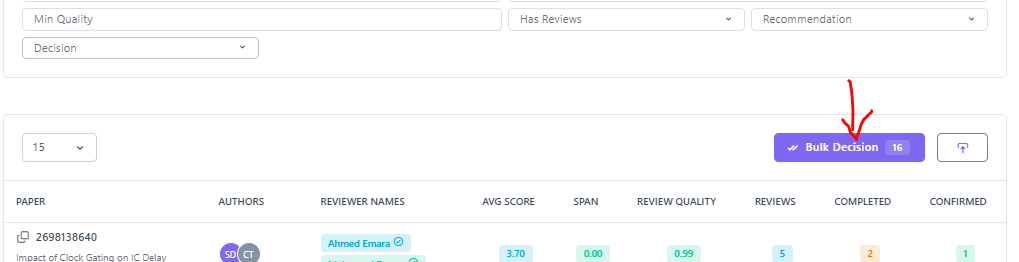
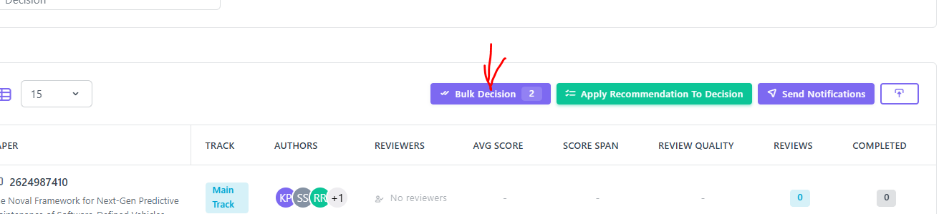
Step 5: Click "Bulk Decision"
At the top right of the table:
- * Click Bulk Decision
- * The button next to it is Export (this allows you to download paper data)
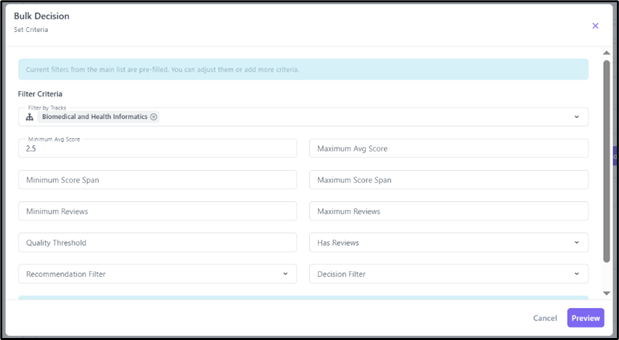
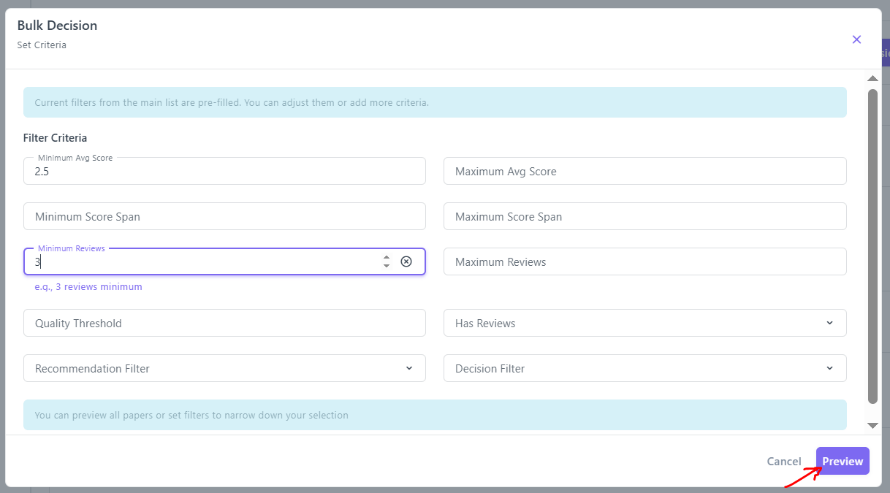
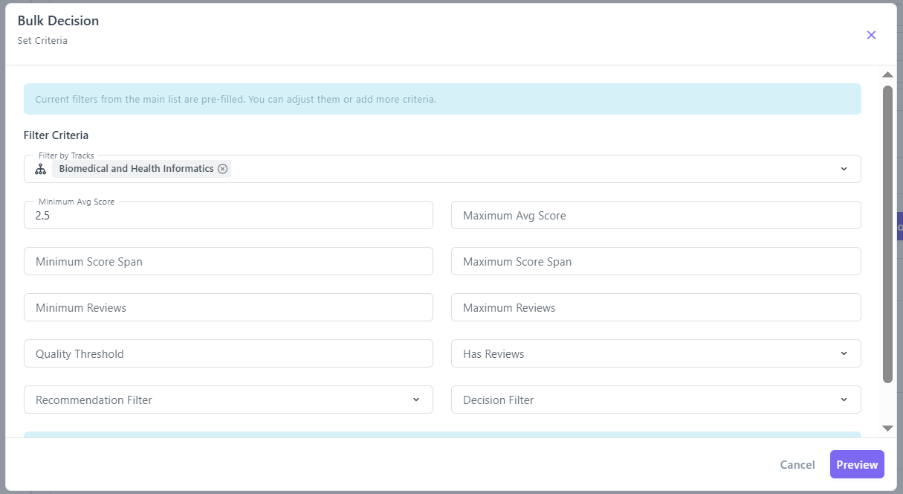
Step 6: Set Selection Criteria
A Bulk Decision – Set Criteria window will appear.
Here you can define which papers you want to select for the decision. For example:
- * Track: Biomedical and Health Informatics
- * Minimum Avg Score: 2.5
After setting your criteria:
👉 Click Preview
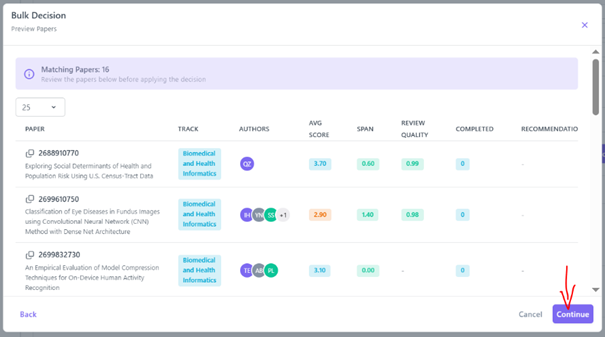
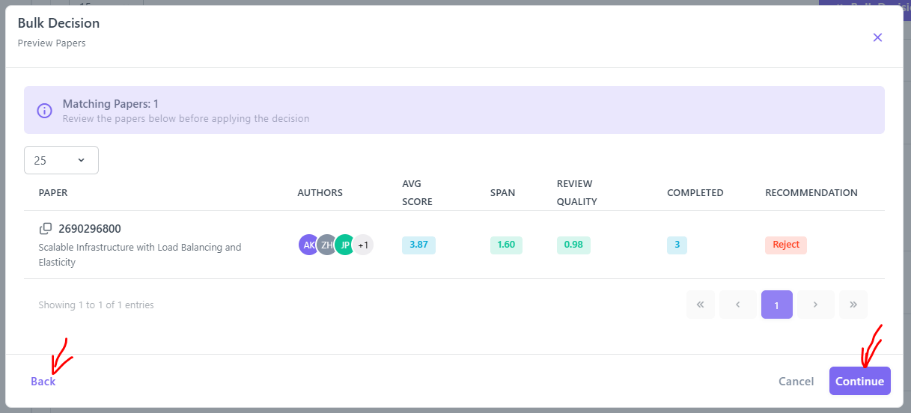
Step 7: Preview Selected Papers
The system will display a list of all papers that match your criteria.
- * If you are satisfied with the selection → Click Continue
- * If you want to modify the criteria → Click Back
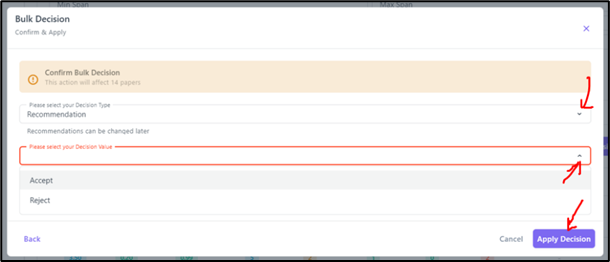
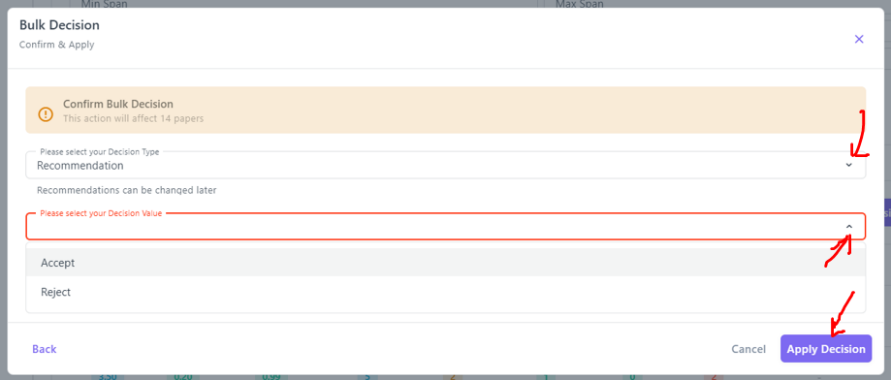
Step 8: Confirm & Apply
After clicking Continue, you will see the Confirm & Apply window.
As a Track Chair, you have:
- * Decision Type: Recommendation (only option available)
Next:
- * Select the Decision Value:
- - Accept
- - Reject
Choose the option based on the decision you want to apply and then click on the Apply Decision button.
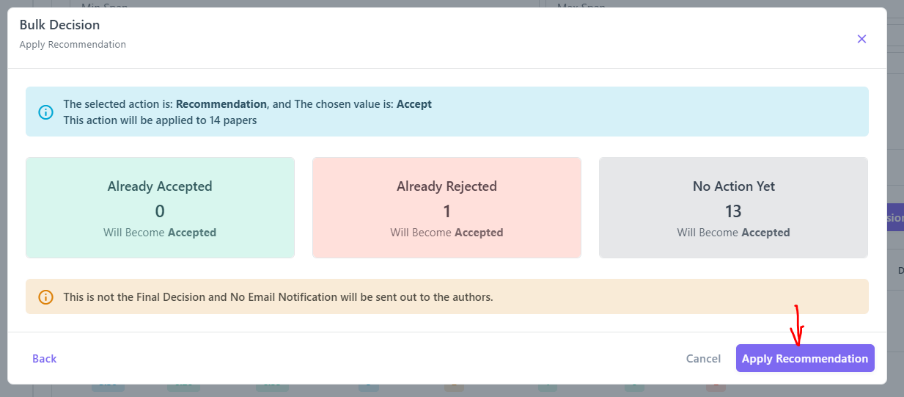
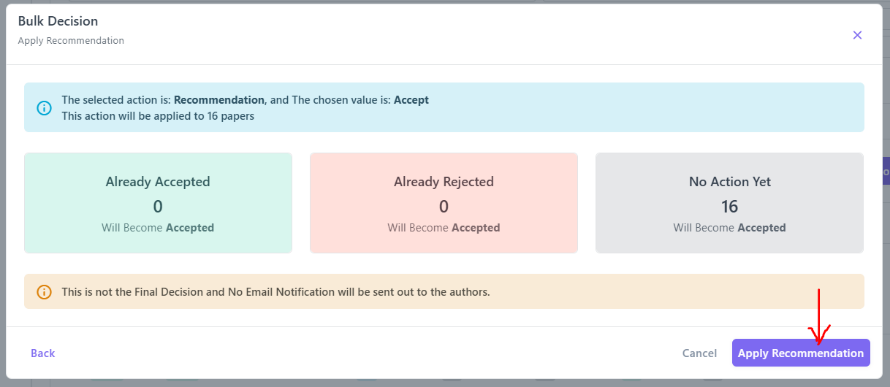
Step 9: Apply Recommendation
On the Apply Recommendation screen:
- * Review the summary
- * Click Apply Recommendation
✅ The recommendation will be applied immediately to all selected papers.
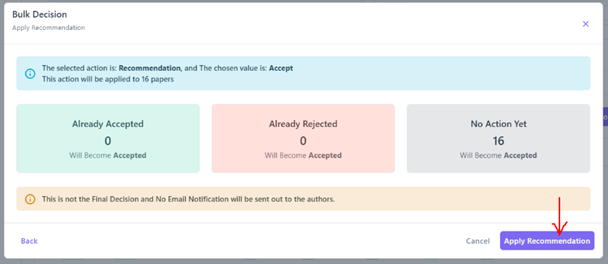
Important Notes
- * This action sets a Recommendation, not the Final Decision.
- * No email notification is sent to authors at this stage.
- * You can use the Export button to download paper data at any time.
This guide explains how a Track Chair can apply recommendations (Accept/Reject) to a single paper or a Bulk of papers. The final decision will be only confirmed by the Conference General Chair(s).
Note: Track Chair(s) can only make recommendations on the paper's whether Accept or Reject. The Final Decision and Author's Notification will be confirmed by the General Chair(s).
Step 1: Access Your Conference
- 1- Log in to Sparcly.ai.
- 2- Click on the Chairing tab in the left menu.
- 3- Select your conference from the list.
You are now inside your conference dashboard.

Step 2: Open Your Track
- 1- Click on the Tracks tab.
- 2- Select the track you are responsible for.
This opens the track management page.
Step 3: Go to the Decisions Tab
Inside your track:
- 1- Click on the Decisions tab.
You will now see the Paper Decisions page with:
- * A Filters section
- * The Papers Table
- * The Bulk Decision button
- * The Export button
1️⃣ Filters Section
At the top of the page, you can filter the papers using criteria such as:
- * Search for a specific paper
- * Minimum / Maximum Average Score
- * Minimum / Maximum Score Span
- * Minimum / Maximum Reviews
- * Review Quality
- * Recommendation: Any Recommendation, Accept, Reject, No Recommendation
- * Decision: Any Decision, Accept, Reject, No Decision
These filters will help you to narrow down which papers are displayed on the paper's table below. For example:
- * You can filter papers with Min Avg Score = 2.5
- * Or show only papers with a certain number of reviews
2️⃣ The Papers Table
Below the filters, you will see a table containing:
- * Paper ID and Title
- * List of Authors
- * Reviewer Names (who completed their reviews only)
- * Average Score
- * Span
- * Review Quality (Cosine Similarity)
- * Total Number of Assigned Reviews
- * Total Number of Completed Reviews
- * Total Number of Confirmed Reviews
- * Total Number of Pending Reviews
- * Total Number of Declined Reviews
- * Initial Recommendation
- * Final Decision
- * List of Actions
👉 Important: Some columns are not immediately visible. You can scroll the table to the right to see more columns:
Option 1 – Keyboard
- * Click inside the table.
- * Use the Right (→) and Left (←) arrow keys to move across columns.
Option 2 – Scroll Bar
- * Go to the bottom of the table.
- * Drag the horizontal scroll bar to the right.

Setting Recommendation for a Single Paper
Step 4: Set the Recommendation
- * Go to the Decisions tab inside your track.
- * In the papers table, scroll to the right to see all columns.
- * The last column is called Actions.
👉 If you don't see it, scroll the table horizontally to the right.
- * In the row of the paper you want to update, click the three dots (⋮) in the Actions column.
- * A small menu will appear:
- - View Review Details → See the full reviews report
- - Set Recommendation
- - Chair Comments
- * Click Set Recommendation.
- * Choose one of the available options:
- - ✅ Accept
- - ❌ Reject
The recommendation will be applied immediately to that specific paper.
To add comments, select Chair Comments.
A window will open where you can add two types of comments:
- * Comments to Authors
- - Visible to the authors.
- - Used to provide feedback, explanations, or notes related to the decision.
- * Confidential Comments to Program Committee
- - Not visible to authors.
- - Used for internal discussion between chairs and committee members.
Click Save Comments to store your input.
Applying Decisions Using Bulk Decision
Step 5: Click "Bulk Decision"
At the top right of the table:
- * Click Bulk Decision
- * The button next to it is Export → this allows you to download paper data
Step 6: Set Selection Criteria
A Bulk Decision – Set Criteria window will appear.
Here you can define which papers you want to select for the decision. For example:
- * Minimum Avg Score: 2.5
- * Minimum Reviews: 3
After setting your criteria:
👉 Click Preview
Step 7: Preview Selected Papers
The system will display a list of all papers that match your criteria.
- * If you are satisfied with the selection → Click Continue
- * If you want to modify the criteria → Click Back
Step 8: Confirm & Apply
After clicking Continue, you will see the Confirm & Apply window.
As a Track Chair, you have:
- * Decision Type: Recommendation (only option available)
Next:
- * Select the Decision Value:
- - Accept
- - Reject
Choose the option based on the decision you want to apply and then click on the Apply Decision button.
Step 9: Apply Recommendation
On the Apply Recommendation screen:
- * Review the summary
- * Click Apply Recommendation
✅ The recommendation will be applied immediately to all selected papers.
Important Notes
- * This action sets a Recommendation, not the Final Decision.
- * No email notification is sent to authors at this stage.
- * You can use the Export button to download paper data at any time.
This guide explains how a Conference General Chair can manage paper decisions in Sparcly. The General Chair is responsible for setting final decisions, managing notifications to authors, and reviewing or adding comments.
The General Chair can:
- * Set Decision: Apply the final decision (Accept/Reject) to papers. This does not trigger notifications automatically.
- * Manage Notifications: Send or resend decision notifications to authors in a separate step.
- * Review & Add Comments: View comments from Track/Program Chairs and add comments for authors or internal use.
- * Set Recommendation: Assign a temporary (non-final) recommendation, typically used by Track Chairs but also available to the General Chair if needed.
Step 1: Access Your Conference
- 1- Log in to Sparcly.ai.
- 2- Click on the Chairing tab in the left menu.
- 3- Select your conference from the list.
You are now inside your conference dashboard.

Step 2: Go to the Decisions Tab
Inside your conference:
- 1- Click on the Decisions tab.
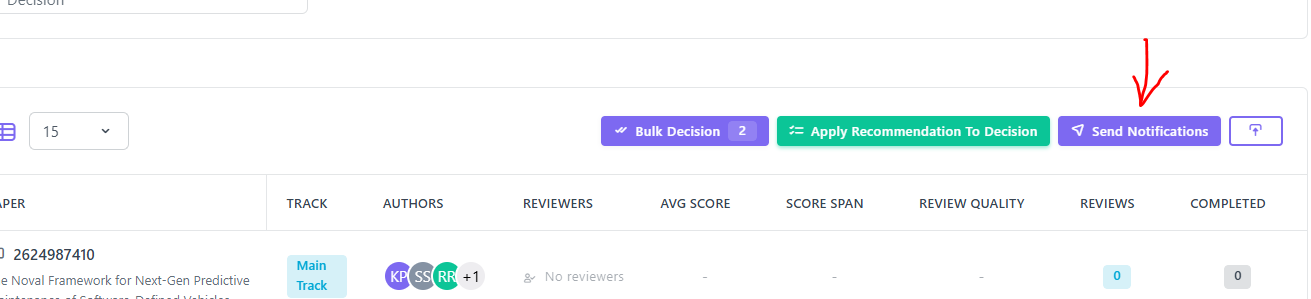
You will now see the Enhanced Paper Decisions page with:
- * Summary Cards
- * A Filters section
- * A Papers table
- * The Bulk Decision button
- * The Apply Recommendation To Decision button
- * Send Notifications
- * The Export button
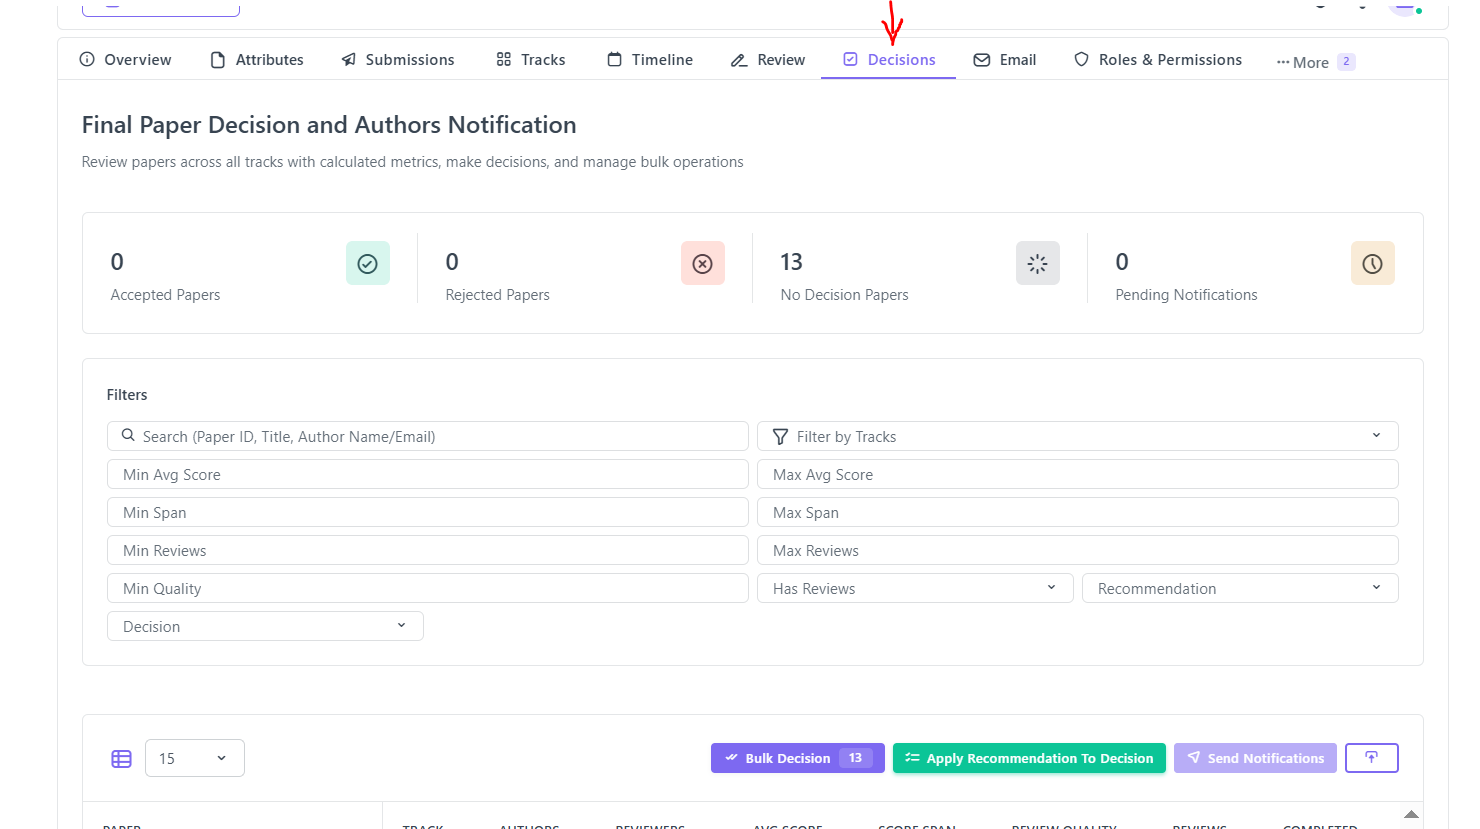
1️⃣ Summary Cards
At the top, you will see key metrics:
- * Accepted Papers – Number of papers with final Accept decisions
- * Rejected Papers – Number of papers with final Reject decisions
- * No Decision Papers – Papers without a final decision yet
- * Pending Notifications – Papers whose decisions have not been emailed to authors
2️⃣ Filters Section
At the top of the page, you can filter papers using criteria such as:
- * Paper ID / Track
- * Minimum / Maximum Average Score
- * Minimum / Maximum Score Span
- * Minimum / Maximum Reviews
- * Review Quality
- * Has Reviews
- * Recommendation
- * Decision
These filters help you narrow down which papers are displayed. For example:
- * You can filter papers with Min Avg Score = 2.5
- * Or show only papers with a certain number of reviews
3️⃣ The Papers Table
Below the filters, you will see a table containing:
- * Paper ID and Title
- * Paper Track
- * Authors
- * Reviewer Names (who completed their reviews only)
- * Average Score
- * Score Span
- * Review Quality
- * Number of Reviews
- * Completed / Confirmed / Pending / Declined Reviews
- * Recommendation
- * Decision
- * Notified On (date of the shared decision notification)
- * Actions
👉 Important: Some columns are not immediately visible. You can scroll the table to the right to see more columns:
Option 1 – Keyboard
- * Click inside the table.
- * Use the Right (→) and Left (←) arrow keys to move across columns.
Option 2 – Scroll Bar
- * Go to the bottom of the table.
- * Drag the horizontal scroll bar to the right.
Step 3: Setting the Final Decision
This task can be performed in three ways:
- * Option 1: Applying Recommendation to Decision
- * Option 2: Setting a Decision for a Single Paper
- * Option 3: Applying Decisions Using Bulk Decision
Option 1: Applying Recommendation to Decision (Bulk)
This feature allows the General Chair to convert recommendations (Accept/Reject) into Final Decisions.

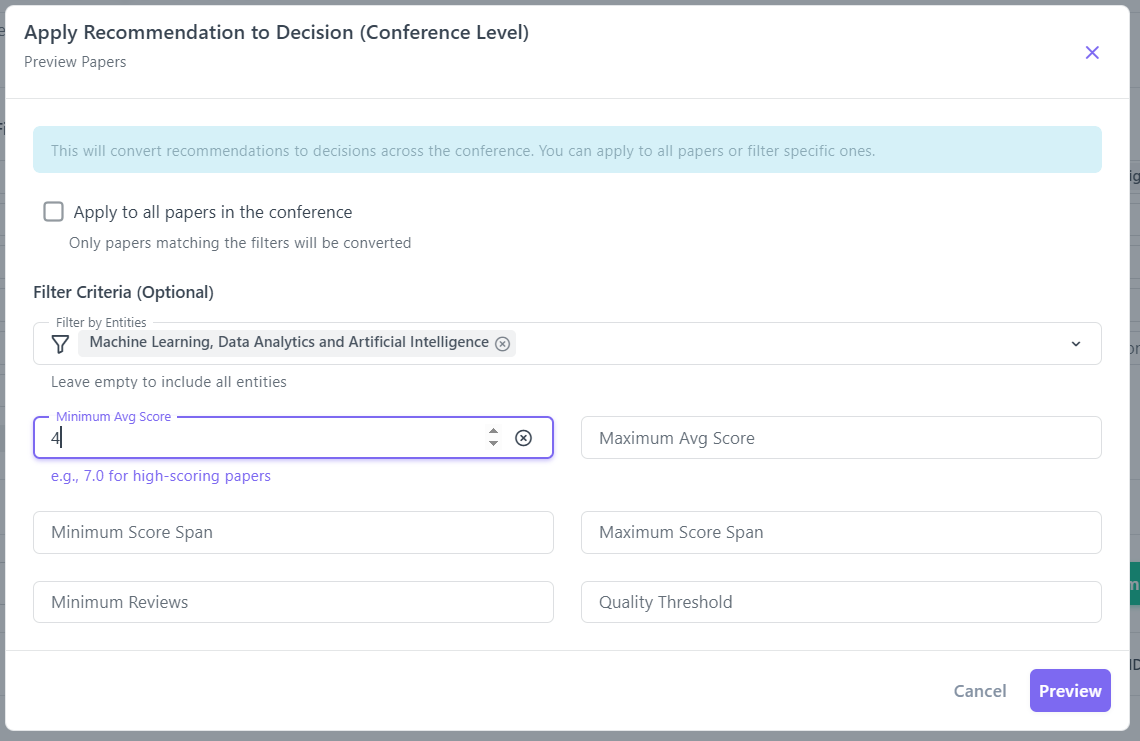
Step 1: Select Target Papers
- * Click Apply Recommendation to Decision.
- * In the first window, select the papers you want to convert:
- - You can check Apply to all papers in the conference, OR
- - Use the filters (Avg Score, Reviews, Entities, etc.) to target specific papers.
- * Click Preview.
The system will show the list of papers that match your filters.
- * Click Apply Decisions to proceed.
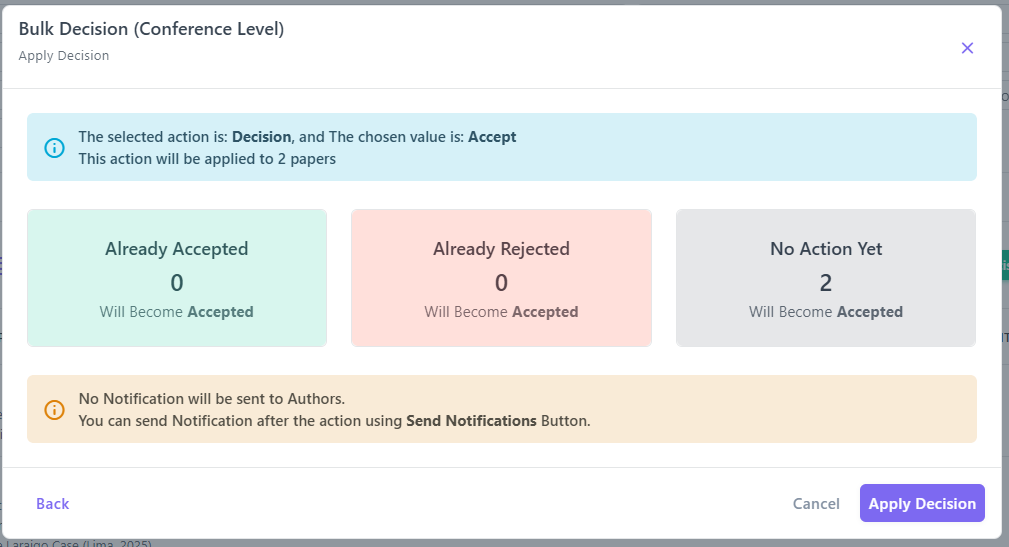
Step 2: Confirm & Apply Decision
After clicking Apply Decisions, a final confirmation box appears. You will see:
- * How many papers with Recommendation (Accept) will become Decision (Accepted)
- * How many papers with Recommendation (Reject) will become Decision (Rejected)
👉 Important: If everything is correct, click Apply Decision to confirm and set the final decisions.
Option 2: Setting a Decision for a Single Paper
Step 1: Set the Decision
- * Go to the Decisions tab inside your conference.
- * In the papers table, scroll to the right to see all columns.
- * The last column is called Actions.
👉 If you don't see it, scroll the table horizontally to the right.
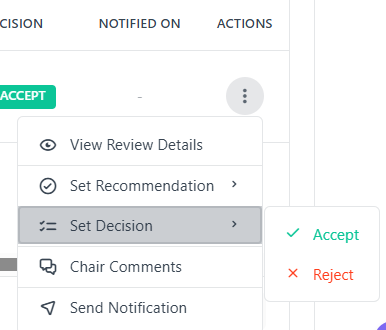
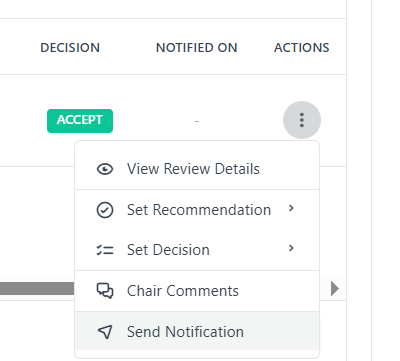
- * In the row of the paper you want to update, click the three dots (⋮) in the Actions column.
- * A small menu will appear:
- - View Review Details
- - Set Recommendation (temporary decision, usually set by track chair)
- - Set Decision (final decision)
- - Chair Comments (write comments to the authors and track chair / check the track chair comments)
- - Send Notification
- * Click Set Decision.
- * Choose one of the available options:
- - ✅ Accept
- - ❌ Reject
The decision will be applied immediately to that specific paper.
The General Chair can also Set Recommendation, which is a temporary decision (non-final).
Option 3: Applying Decisions Using Bulk Decision
Step 1: Click "Bulk Decision"
At the top right of the table:
- * Click Bulk Decision
- * The button next to it is Export (this allows you to download paper data)
Step 2: Set Selection Criteria
A Bulk Decision – Set Criteria window will appear.
Here, you can define which papers you want to select for the decision. For example:
- * Track: Biomedical and Health Informatics
- * Minimum Avg Score: 2.5
After setting your criteria:
👉 Click Preview
Step 3: Preview Selected Papers
The system will display a list of all papers that match your criteria.
- * If you are satisfied with the selection → Click Continue
- * If you want to modify the criteria → Click Back

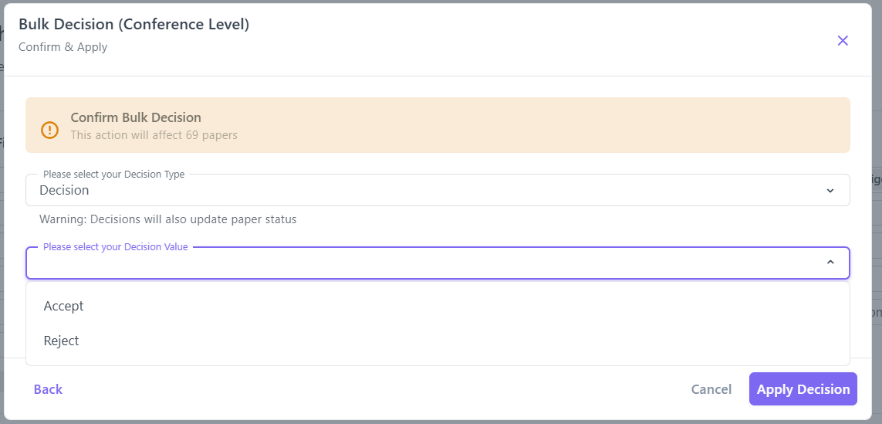
Step 4: Confirm & Apply
After clicking Continue, you will see the Confirm & Apply window.
As a General Chair, you have:
- * Decision Type:
- - Recommendation
- - Decision
Next:
- * Select the Decision Value:
- - Accept
- - Reject
Choose the option based on the decision you want to apply and then click on the Apply Decision button.
Step 5: Apply Recommendation
On the Apply Recommendation screen:
- * Review the summary
- * Click Apply Recommendation
✅ The recommendation will be applied immediately to all selected papers.
Step 4: Managing the Notification
Notifications for a single paper or multiple papers. Notifications can only be sent to papers that have a decision set.
- * Multiple papers:
- - Click the Send Notifications button at the top.
- * Single paper:
- - In the row of the paper you want to update, click the three dots (⋮) in the Actions column.
- - Click on Send Notification.
Confirm & Send
- 1- A confirmation window will appear.
- 2- Click Send Notification(s) to proceed.
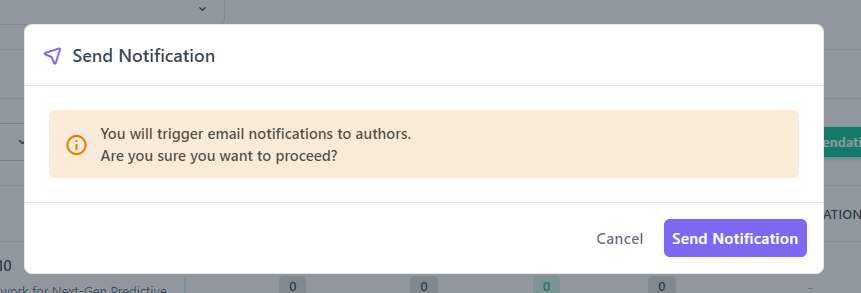
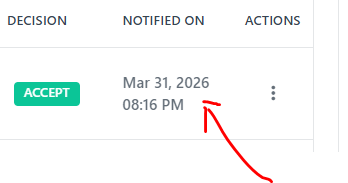
Authors will receive the decision email.
After sending, the Notified On column will show the date and time.
Re-Send Notification
- * Use the (⋮) in Actions column to select the option Re-Send Notification to send it again for a given paper.
Clicking on Send Notifications (for multiple papers) again will send notifications only to papers that have not been notified yet.

Important Notes
- * The General Chair can also choose Set Recommendation instead. A recommendation is a temporary (non-final) decision. It is usually set by the track chairs.
- * Through the Chair Comments option, the General Chair can write comments to authors and leave confidential comments on a specific paper. They can also view comments left by other chairs from the same tab.
- * The General Chair can use the Export button to download paper data at any time.
Sparcly allows Conference Chairs and Organizers to fully customize how their conference operates. From submission rules to review workflows, you can configure all essential settings directly within the conference dashboard.
Below are the key settings you can modify:
1. General Conference Information
You can update:
- Conference name and abbreviation
- Description and website link
- Important dates (submission, review, camera-ready, registration, etc.)
- Conference logo and branding
- Time zone and display preferences
2. Submission Settings
Control how authors submit their papers:
- Enable/disable submissions
- Set page limits and allowed formats (PDF, abstract only, etc.)
- Assign paper categories (e.g., Full Paper, Short Paper, Poster)
- Enable plagiarism/similarity checks
- Define metadata fields required from authors (title, keywords, abstract, etc.)
- Configure withdrawal options
3. Track & Session Settings
Each track can have custom settings, including:
- Track Chairs and Co-Chairs
- Track-specific submission deadlines
- Custom review forms
- Paper categories per track
- Track visibility and activation
Tracks can inherit settings from the main conference or be fully customized.
4. Review Settings
You can configure the entire review process:
- Single-blind or double-blind reviewing
- Number of required reviews per paper
- Reviewer assignment rules
- Review form structure and question weights
- Bidding options (enable/disable reviewer bidding)
- Conflict of interest (COI) settings
5. Decision Settings
Manage how decisions are made and controlled:
- Decision types (Accept, Reject, Revise, etc.)
- Bulk decision rules
- Temporary vs. final decision workflow
- Notification templates for acceptance and rejection
6. Registration & Payment Settings
If registration is enabled:
- Ticket types and pricing
- Early-bird and late registration deadlines
- Payment methods (credit card, wire transfer, etc.)
- Invoice customization
- Coupon or discount rules
7. Email & Notification Settings
Configure automated and manual emails:
- Templates for submission confirmation, acceptance, rejection, reminders
- Custom placeholders for dynamic fields
- Enable/disable specific email types
- Bulk email tools for authors, reviewers, and TPC
8. Roles & Permissions
Assign and manage access levels:
- Conference Chair
- Track Chair
- Reviewer
- Author
- Organizer roles
- Custom permission settings for each role
9. Camera-Ready & Proceedings Settings
Define requirements for accepted papers:
- Camera-ready upload deadlines
- IEEE or publisher formatting instructions
- eCF/metadata requirements
- Proceedings generation and exporting
10. Additional Advanced Settings
Depending on your setup, you can configure:
- Similarity index thresholds
- API/Webhooks for integrations
- Sponsor/partner visibility
- Virtual conference features (if enabled)
- Custom fields for authors and reviewers
Activity logs allow you to track all important actions taken throughout your conference—such as submissions, updates, reviews, assignments, decisions, and user activity. Sparcly provides a centralized Activity Log page where you can review, filter, and export all logs for auditing or record-keeping.
Viewing Activity Logs
- Go to Conferences and select your event.
- In the top navigation bar, click More → Activity Logs.
- You'll see a complete list of logged actions, including:
- Submission events
- Review activity
- Decision actions
- Assignment changes
- User and role updates
- Email notifications
- Use the filters at the top to narrow logs by:
- Date range
- User
- Action type
- Track or submission
This helps you quickly find specific actions or trace the history of a submission.
Exporting Activity Logs
You can export all logs or only filtered results.
- Apply any filters you want (optional).
- Click the Export button in the top-right corner.
- Choose your preferred format:
- CSV (recommended for analysis or Excel)
- PDF (recommended for reporting)
The export will include timestamps, user information, and detailed activity descriptions.
Sparcly provides a complete email management system that allows organizers to customize templates, automate reminders, and run Call for Papers (CFP) campaigns.
1. Email Templates
You can view and edit templates for all automated emails your conference may send.
Templates are grouped into categories such as:
- Paper Submission (e.g., submission confirmation, PDF missing reminder, withdrawn notice)
- Review Process (e.g., review request, reminders, reviewer decisions)
- Decisions (paper accepted/rejected notifications)
- Camera Ready & Registration
- Event Creation & Management (e.g., role invitations, export notices)
Select any category → click a template → edit subject & body.
All templates support variables like: {{conference_name}},
{{recipient_first_name}}, {{submission_deadline}}
2. Email Reminders
Automatic reminders can be configured for situations such as missing PDF uploads or upcoming deadlines.
For each reminder, you can set:
- Reminder frequency
- Maximum number of reminders to send
- On/off toggle for activation
- Template used for the reminder
Reminders run automatically—no manual action is required once enabled.
3. Call for Papers (CFP) Campaigns
You can send promotional CFP emails to specific target audiences:
- Previous Authors
- TPC Members
- Domain Contacts (researchers in a matching specialization)
When creating a CFP campaign, you can:
- Enter campaign name & subject
- Write or paste the full email content
- Insert dynamic variables (e.g.,
{{conference_link}},{{submission_link}}) - Preview & send the campaign in one click
1. Navigate to the TPC Members Page
- Open Chairing from the left sidebar
- Select your Conference
- Choose the Track you want to manage from the tab Tracks
- From the top menu, click Review
- In the Review menu, select TPC Members
You are now on the TPC Members management page for that track.
2. Understanding the TPC Members Page
The TPC Members page gives you a quick overview of reviewer activity and roles for the selected track.
Statistics Overview (Top Section)
Each box summarizes the current status of your review committee:
- Total Reviewers
Total number of members who invited to review submissions in this track. - Invited
Invitations that have been sent but not yet accepted. - Accepted
TPC members and TPC Reviewers who have accepted the invitation. - TPC Members
TPC members who have accepted the invitation.
👉 TPC Members can delegate reviews to other reviewers. - TPC Reviewers
TPC reviewers who have accepted the invitation
👉 TPC reviewers can review papers assigned to them, and cannot delegate. - Delegated
Reviews that were assigned by TPC Members to others.
3. Inviting TPC Members or TPC Reviewers
To invite new members, click Invite Members (below the statistics section).
This opens the Invite TPC Members dialog.
3.1. By Email tab lets you invite one or many members at once.
- Select Role for All Members
- TPC Member
- Can review papers assigned to them, AND
- Can delegate invitations to other reviewers
- TPC Reviewer
- Can review papers assigned to them
- Cannot delegate reviews
- TPC Member
- Enter Members Email Addresses
- One email per line (supports bulk invitations)
- (Optional) Enable Auto Accept
- Invitations are automatically accepted
- Useful when you already have confirmation from the invitees
- Click Send
- Invitations are sent via email
- Invited members appear in the statistics and Members list below
3.2. Invite Existing Track Authors
You can also invite members who already submitted papers to this track.
How it works
- Switch to the Track Authors tab
- Search authors by name or email
- Select individual authors or enable Invite All Authors in Track
- Choose whether to Auto Accept
- Click Invite
4. Managing Invited TPC Members After Invitation
Once invitations are sent, all invited members appear in the Members list for the track.
This list gives the Chair full visibility and control over invitation status and roles.
(Don't forget to refresh the page to get the updated list)
4.1 Understanding Member Statuses
Each invited member has a status that reflects their current state:
- Pending
- Invitation has been sent out. The member has not responded yet.
- The Chair can Accept or Decline the invitation on their behalf
- Accepted
- The member has accepted the invitation. They are now active as a TPC Member or TPC Reviewer. They can participate in the review process
- Declined
- The invitation was declined by the member or declined by the Chair on their behalf
- The member will not participate in the review process unless re-invited
The Date column shows when the invitation was sent and, if applicable, when it was accepted.
4.2 Available Actions for Each Member
Using the Actions (⋮) menu next to an accepted member, the Chair can:
- Manage Paper Assignments
- Assign or unassign papers for this member
- Useful for balancing review workload
- Update Role
- Change between:
- TPC Member (can delegate reviews)
- TPC Reviewer (review-only role)
- Change between:
- Remove Member
- Completely remove the member from the track's TPC
- The member will no longer have access to reviews for this track
The Reset Assignments feature allows Chairs to remove existing reviewer assignments from one or more papers. This is useful when assignments need to be reworked, corrected, or completely redone.
⚠️ Important: Resetting assignments is a permanent action and cannot be undone.
9.1 Entering Reset Mode
On the Assignment page:
- Click the Reset Assignments button (top-right of the assignment panel)
- The page switches to Reset Mode
When Reset Mode is active:
- A warning banner appears: "Reset Mode: Select papers to remove all their assignments"
- Papers with existing assignments are highlighted
- Assignment-related controls change to reset-specific actions
9.2 Selecting Papers to Reset
In Reset Mode:
- Only papers with assignments are selectable
- You can:
- Select individual papers using the checkbox
- Use Select All to reset all assigned papers
- For each selected paper, the system shows:
- Assigned reviewers that will be removed
- Current reviewer coverage (e.g. 2/5 reviewers)
- Assignment status (e.g. Under-assigned)
The reviewers listed under Assignments to Remove are the ones that will be unassigned.
9.3 Reset Controls
While in Reset Mode, the following controls are available:
- Select All – select all papers with assignments
- Clear – clear current selections
- Cancel – exit Reset Mode without making changes
- Reset (N) – proceed to reset assignments for the selected
papers
(N = number of selected papers)
9.4 Confirming Reset Assignments
Clicking Reset (N) opens a confirmation dialog.
The confirmation dialog shows:
- A clear warning message that the action is permanent
- The list of papers to be reset
- The number of reviewers that will be removed
- Total assignments that will be deleted
Available actions: Cancel or Reset Assignments
9.5 What Happens After Reset
Once confirmed:
- All selected paper–reviewer assignments are removed
- Papers return to an unassigned or under-assigned state
- Reviewer workload counters are updated
- You can immediately start assigning reviewers again using drag & drop
The Suggested Assignment mode helps Chairs assign reviewers faster by using Sparcly's automatic reviewer suggestions, while keeping full control over final decisions.
1. Accessing Suggested Assignment
Suggested Assignment is accessed from the same Assignments page.
Navigation steps
- Open Chairing
- Select your Conference
- Choose the Track
- Click Review
- Select Assignments
- From the assignment mode dropdown, choose Suggested Assignment
You are now in Suggested Assignment mode.
2. Suggested Assignment Page Overview
In this mode, Sparcly displays recommended reviewers for each paper, along with matching scores and quality indicators.
Page layout
Top summary bar
- Total Papers – number of papers in the track
- Assigned – number of papers with confirmed assignments
- Completed – reviews completed so far
- Review constraints:
- Reviews per paper (min / max)
- Maximum papers per reviewer
Paper cards
Each paper card includes:
- Paper title and metadata (track, topics)
- Authors
- Required number of reviewers (e.g. 0/3 reviewers)
- Assignment status (e.g. Unassigned)
3. Reviewer Suggestions
For each paper, Sparcly shows a Suggestions panel:
- Suggested reviewers ranked by relevance
- Each suggestion includes:
- Reviewer name and email
- Match score
- Match label (e.g. Excellent Match)
- Green validate (✓) button
These suggestions are generated automatically based on system criteria.
4. Approving Suggested Reviewers (Single Paper)
Chairs can approve suggestions one by one.
How to approve a suggestion
- Click the green validate (✓) icon next to a suggested reviewer
- or Drag the reviewer into the Assigned Reviewers area
Once approved:
- The reviewer appears under Assigned Reviewers
- The reviewer counts updates
- The paper moves closer to completion
Repeat until the required number of reviewers is reached.
5. Adding Other Reviewers Manually
Suggested Assignment does not limit Chairs to system recommendations.
You can also:
- Drag any reviewer (TPC Member or Reviewer) into the Assigned Reviewers area
- Mix suggested and manual assignments freely
This allows Chairs to override or fine-tune system suggestions when needed.
6. Confirming Assignments
After reviewing and approving assignments:
- Click Confirm Assignments
- Review the list of pending assignments
- Click Confirm & Send
Reviewers will receive email notifications and can accept or decline their assignments.
7. Bulk Action – Accept Suggestions for Multiple Papers
For faster workflows, Chairs can approve suggestions for multiple papers at once.
How Bulk Action works
- Click Bulk Action
- Select the papers you want to process
- Click Accept (N)
(N = number of selected papers)
Sparcly will:
- Accept the system's suggested reviewers for those papers
- Add them as assigned reviewers
- Prepare them for confirmation
You can still review and adjust assignments before final confirmation.
8. Finalizing Suggested Assignments
Once bulk or individual approvals are complete:
- Review the assignments
- Click Confirm Assignments
- Click Confirm & Send
All reviewers will be notified, and assignments move to Pending status until accepted.
This section explains how a Chair or Track Chair assigns papers to TPC members and reviewers using the Assignments feature.
1. Navigate to the Assignments Page
- Open Chairing
- Select your Conference
- Choose the Track from the Tracks tab
- From the top menu, click Review
- Select Assignments
This opens the Paper Assignment Management page for the selected track.
2. Paper Assignment Management Page Overview
The Assignments page is the central place to manage how papers are assigned to reviewers.
- Assignments: Used to create and manage assignments
- Summary: Shows an overview of assignment progress (Reviewers names, Reviews Assigned, Reviews Declined, Reviews Confirmed, and Reviews Completed)
3. Assignment Modes
Sparcly offers three assignment modes, selectable from the dropdown on the top-right:
- Interactive Assignment
- Manual drag-and-drop assignment
- Suggested Assignment
- Suggested recommendations for review assignment
- Enhanced Auto Assignment (AI-powered)
- Advanced automated assignment with full control and preview
4. Interactive Assignment Mode
Interactive Assignment allows Chairs/Track Chairs to manually assign reviewers by dragging them onto papers.
Page layout
Left panel – Available Reviewers
- Lists all available TPC Members and TPC Reviewers
- Each reviewer shows:
- Name
- Assigned reviews / maximum capacity (e.g. 0/5)
- 0 = currently assigned reviews
- 5 = maximum allowed reviews
Right panel – Papers
- Lists submitted papers
- Each paper shows:
- Paper category, title and track
- Assigned reviewers section
- Required number of reviewers (e.g. 2/5 reviewers)
- Status (e.g. Unassigned)
5. Assigning Reviewers to Papers
- From Available Reviewers, drag a reviewer
- Drop it to the Assigned Reviewers area of a paper
- Repeat for additional reviewers or papers
As reviewers are added:
- The reviewer's counter updates (e.g. 1/5)
- The paper's reviewer count updates (e.g. 2/5 reviewers)
6. Confirming Assignments
Once you finish dragging reviewers:
- Click Confirm Assignments
- Review the pending assignments in the confirmation dialog
- Click Confirm & Send
What happens next
- Reviewers receive email notifications
- They can accept or decline the assignment
- Assignments are marked as Pending until accepted
7. Assignment Status and Visual Indicators
After confirmation:
- Assigned reviewer names change color
- Hovering over a reviewer shows Pending
- Papers update their assignment progress
- Reviewer capacity counters update dynamically
Assigned reviews / Maximum allowed reviews for that reviewer
8. Summary Tab – Review Assignments Overview
The Summary tab provides a high-level overview of the current review assignment status for the selected track. It helps Chairs quickly monitor progress and identify gaps or delays.
8.1 Summary Metrics
At the top of the page, key metrics give an instant snapshot of review progress:
- Total Papers
- Total number of submitted papers in the track
- Total Assignments
- Number of review assignments created across all papers
- Completed Reviews
- Reviews that have been fully submitted by reviewers
- Pending Reviews
- Reviews that are assigned but not yet completed
These indicators update as reviewers accept, decline, and complete their reviews.
8.2 Refreshing the Data
- Use the Refresh button to fetch the latest assignment and review status
- Useful when assignments or reviewer actions were made recently
8.3 Detailed Review Status Table
Below the metrics, a detailed table shows the review status per paper.
Table columns explained
- Paper
- Paper ID and title
- Author Names
- List of authors for the paper
- Reviewer Names
- Reviewers currently assigned to the paper
- Reviews Assigned
- Total number of assigned reviewers
- Reviews Declined
- Number of declined assignments
- Reviews Confirmed
- Reviewers who accepted the assignment
- Reviews Completed
- Reviews that have been submitted
8.4 Search and Filtering
- Use the search bar to quickly find papers by:
- Paper ID
- Title
- Author name
- Reviewer name
This is especially useful for large tracks with many submissions.
The Enhanced Auto Assignment mode automatically assigns reviewers to papers using Sparcly's AI, while giving Chairs full preview, transparency, and final approval.
This mode is ideal when you want fast, balanced, bidding-aware, and conflict-aware assignments with minimal manual effort.
1. Accessing Enhanced Auto Assignment
Enhanced Auto Assignment is available from the Assignments page.
Navigation steps
- Open Chairing
- Select your Conference
- Choose the Track
- Click Review
- Select Assignments
- From the assignment mode dropdown, choose Enhanced Auto Assignment (Powered AI)
You are now in the Enhanced Auto Assignment mode.
2. Enhanced Auto Assignment Overview
Before running the assignment, Sparcly verifies that prerequisites are met.
What the page shows
- Review Form Weight Status: Confirms the review form is fully configured (e.g. Total Weight: 1.00 / 1.0)
- Assignment description: Advanced auto-assignment with full control and preview
- A single action button: Process Auto-Assignments
At this stage, no assignments are created yet.
3. Running Auto Assignment
To start the process:
- Click Process Auto-Assignments
4. Assignment Preview
After processing, Sparcly shows an Assignment Preview before anything is finalized.
Preview summary boxes
- Total Papers – number of papers considered
- Assignments to Create – number of reviewer–paper assignments
- Failed Assignments – assignments that could not be generated
- Already Assigned – papers that were previously assigned
- Conflict Status
- Indicates whether conflicts were detected (e.g. No Conflicts)
Preview table
For each paper, you can see:
- Paper ID and title
- Suggested reviewers
- Average matching score
- Papers without suggestions (if any)
👉 This step gives Chairs full visibility before execution.
5. Confirming Auto Assignment
Once the preview is reviewed:
- Click Confirm & Execute
A confirmation dialog appears.
Confirmation dialog
Choose:
- Cancel – return to preview
- Execute Assignment – finalize auto assignment
6. Assignment Completion
A Run New Assignment button is available to repeat the process if necessary.
For Reviewers (TPC Members)
- Open the My Reviews module to view all assigned submissions.
- Each entry displays the review deadline and current status.
Opening Assigned Papers:
- Select any paper to view the abstract, metadata, and PDF file.
- Download the PDF to read the full manuscript.
Submitting a Review:
- Complete all required fields in the review form.
- Provide comments to authors and confidential comments to chairs.
- Submit your review before the deadline.
- If allowed, open the review again and select 'Edit Review'.
- Modify responses as needed and resubmit.
- Open the Bidding module to view available submissions.
- Select whether you want to review, are neutral, or prefer not to review each paper.
- Mark any conflicts of interest.
- If enabled by the conference chair, you may participate in decision voting.
- Access the voting interface from your reviewer dashboard.
- Cast your vote on papers after reviews are complete.